- Quick Start
- Dashboard
- Assets
- Components
- Stock Control
- Labels and QR Codes
- Maintenance
- Depreciation
- Reference Data
- Users and Settings
- Reports
- Best Practices
Quick Start
The Asset Management System keeps one shared record of the company assets, components, locations, employees, and maintenance history. The left menu is your main navigation. Most list pages work the same way: search, export, add new data, and use the action menu on each row.
- Sign in. Open the system link and enter your company email and password.
- Check the dashboard. Review totals and recent asset/component activity.
- Find or add the record. Use the correct menu, search box, Add data button, or CSV import where available.
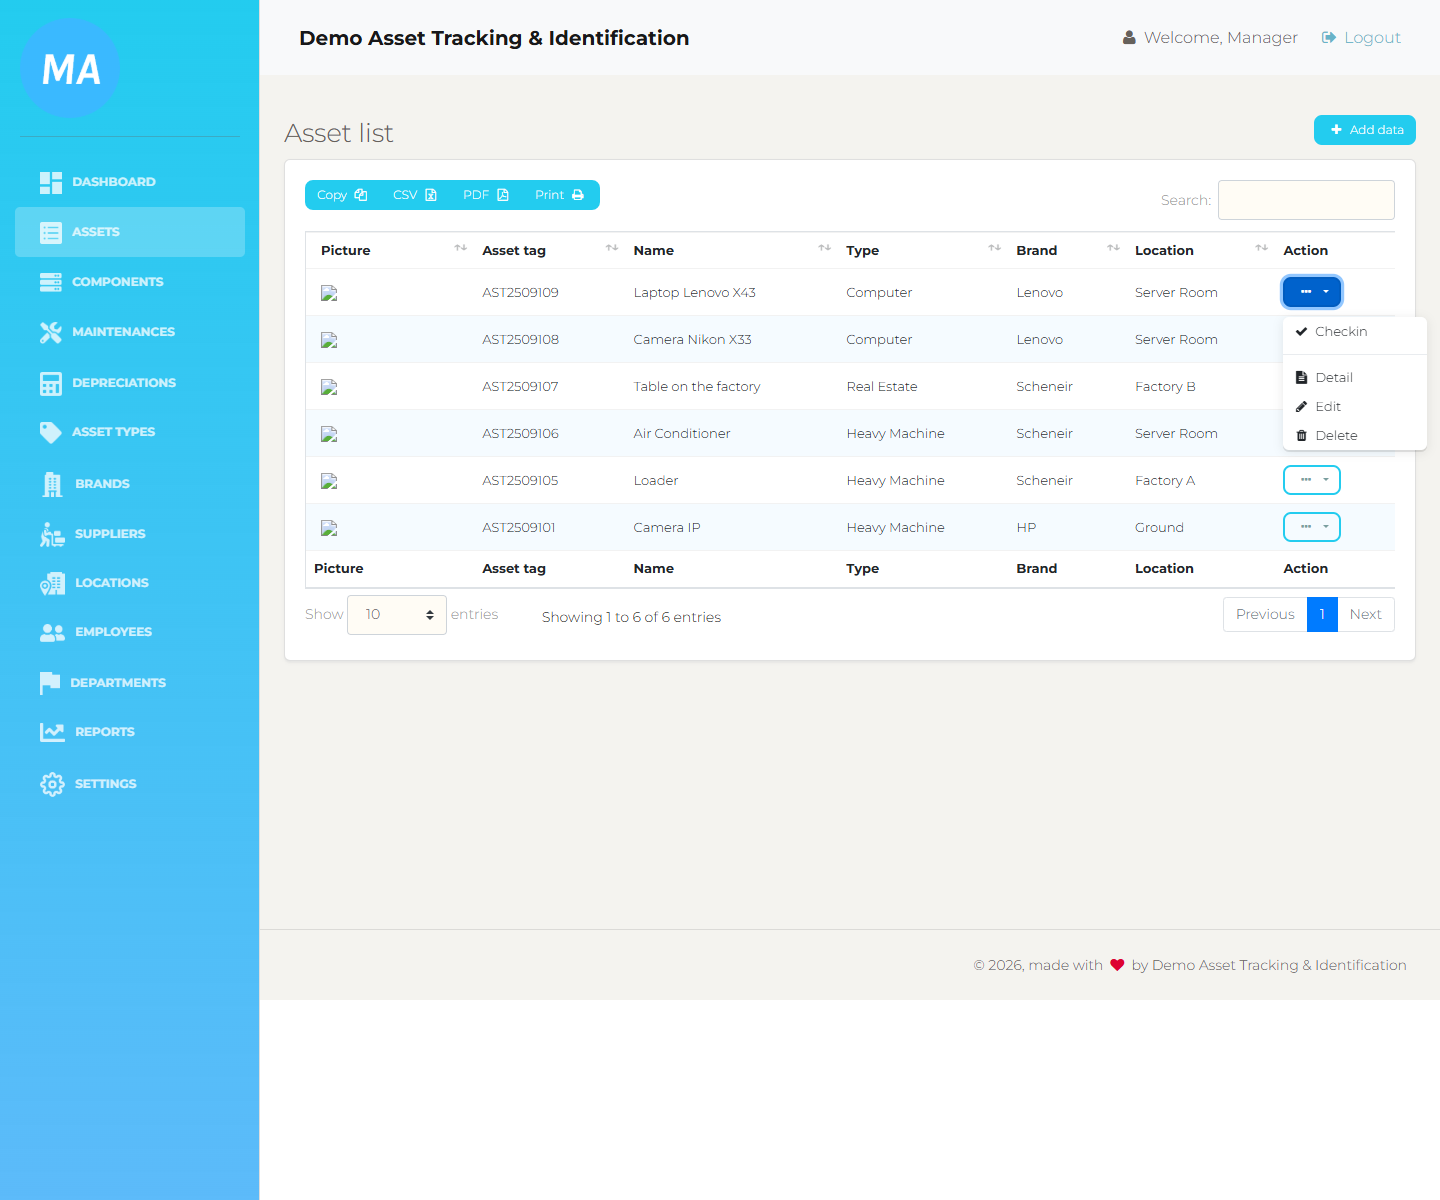
- Use the row action menu. Open the three-dot menu to view details, generate a label, edit, check in/check out, send an asset or component for maintenance, or delete where your role permits it.
- Use reports when you need a wider view. Reports can show activity, maintenance, stock, asset status, type, supplier, location, and management insights.
Dashboard
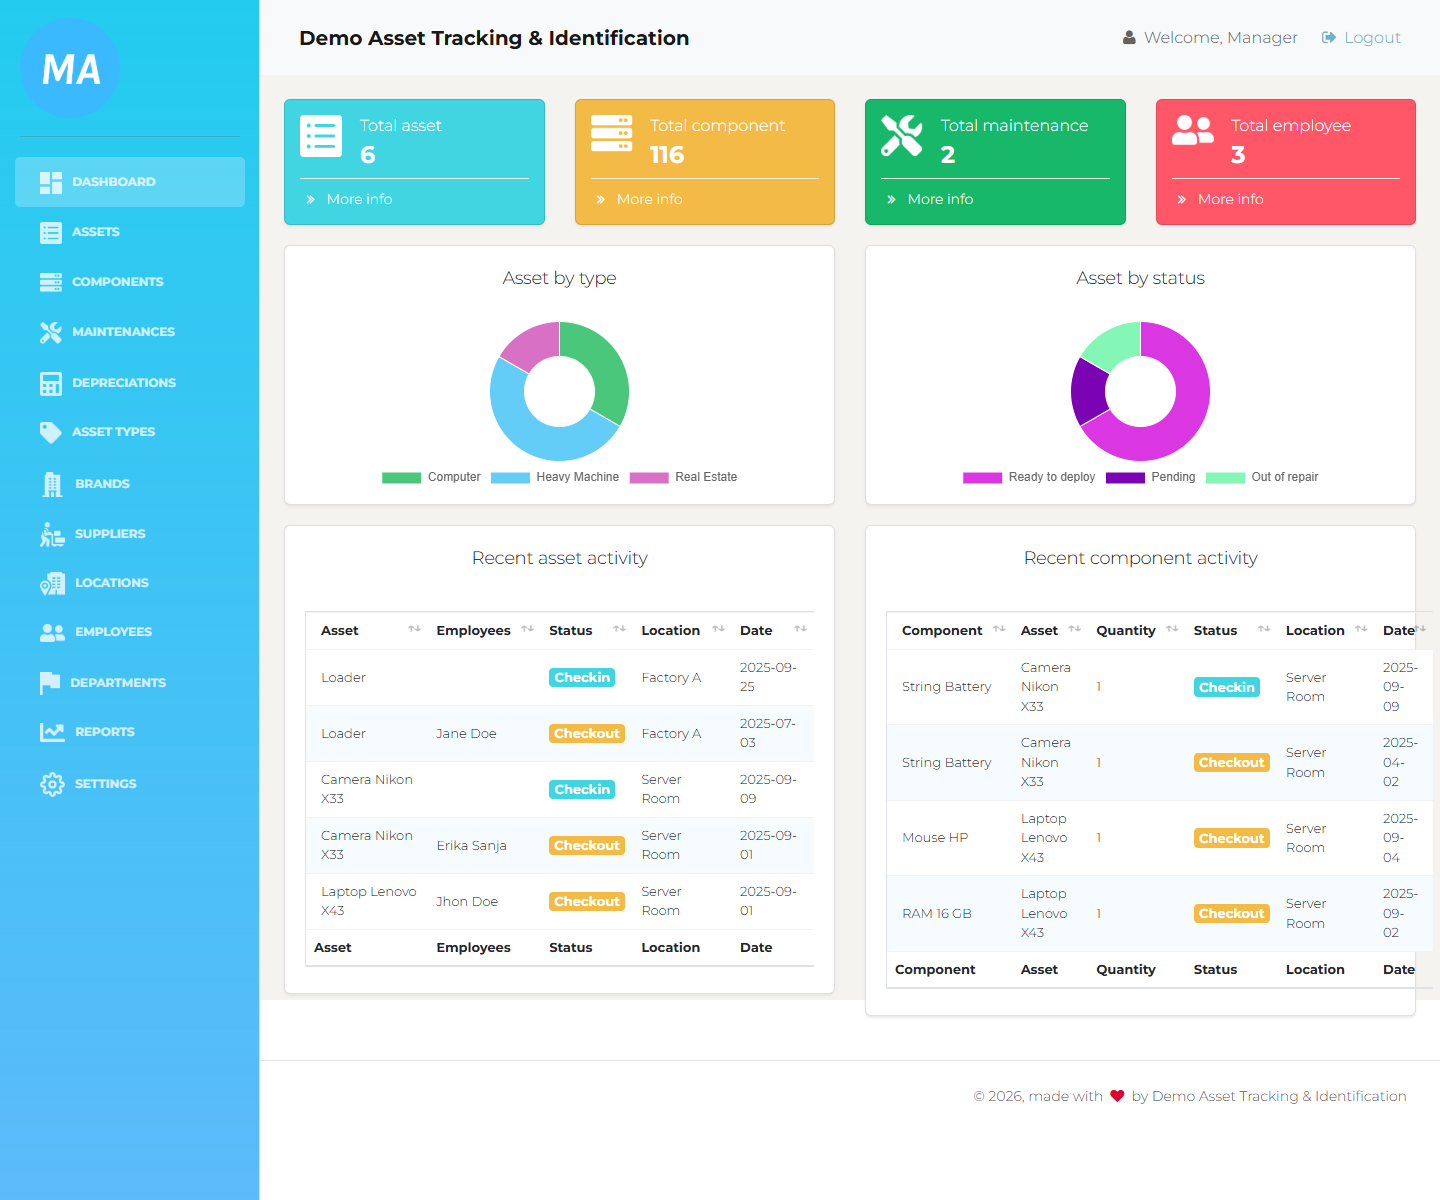
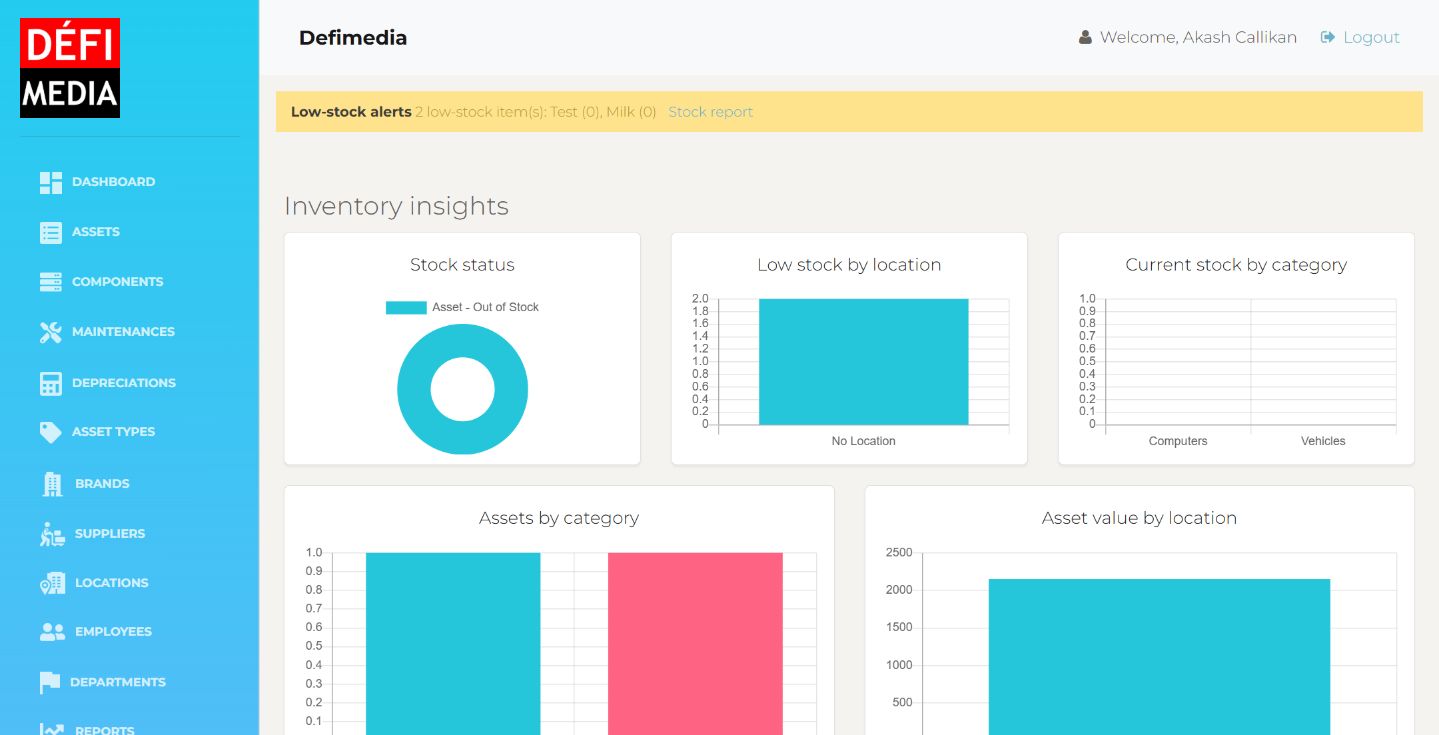
The dashboard gives a fast overview of the asset register. It shows total assets, components, maintenance records, employees, low-stock alerts, charts, and recent activity tables.
Assets
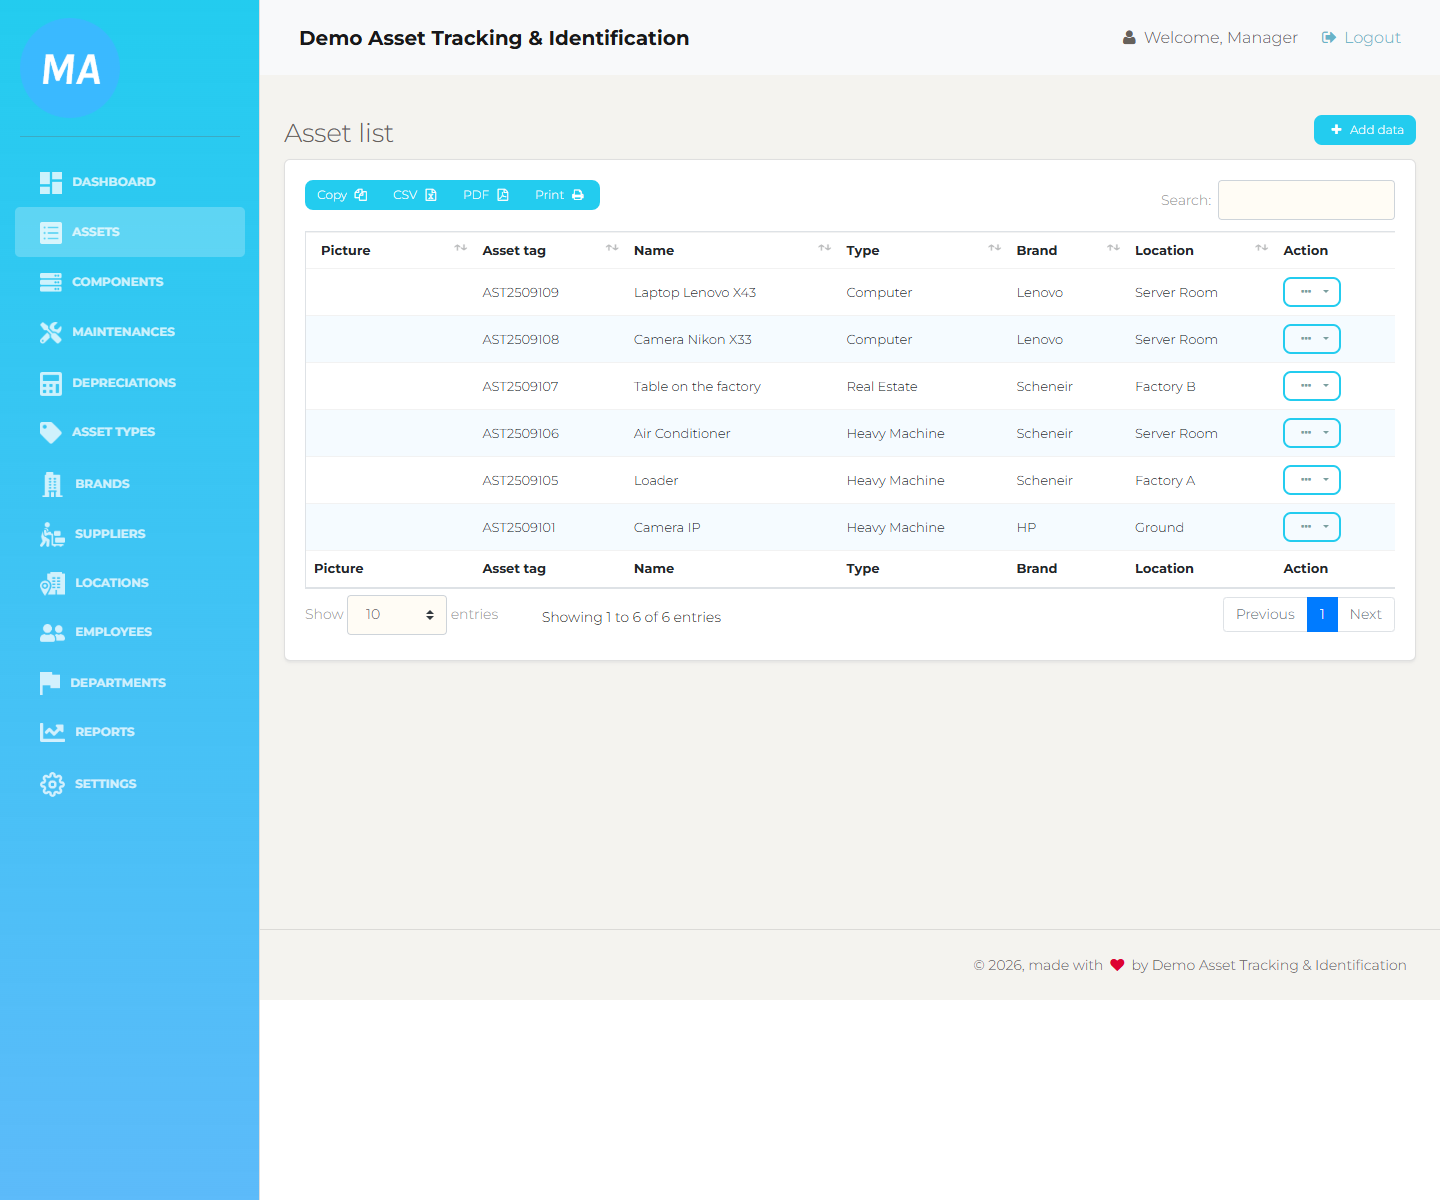
An asset is a main company item, such as a laptop, camera, machine, furniture item, or equipment unit. The Assets screen is where you add assets, search for them, export lists, view details, and record check-in/check-out movement.
Finding an Asset
- Use the Search box to filter by asset tag, name, type, brand, location, current stock, stock status, employee, or status.
- Use the column headings to sort the list.
- Use the visible Current stock and Stock status columns to see availability without opening the detail page.
- Use the visible Location, Employees, and Status columns to understand where the item is and whether it is assigned or under maintenance.
- Use Copy, CSV, PDF, or Print when you need to share or archive the list.
Adding a New Asset
Click Add data on the Asset list. Fill the form with the clearest available information. The asset tag is generated automatically, but confirm it matches your company’s naming process before saving.
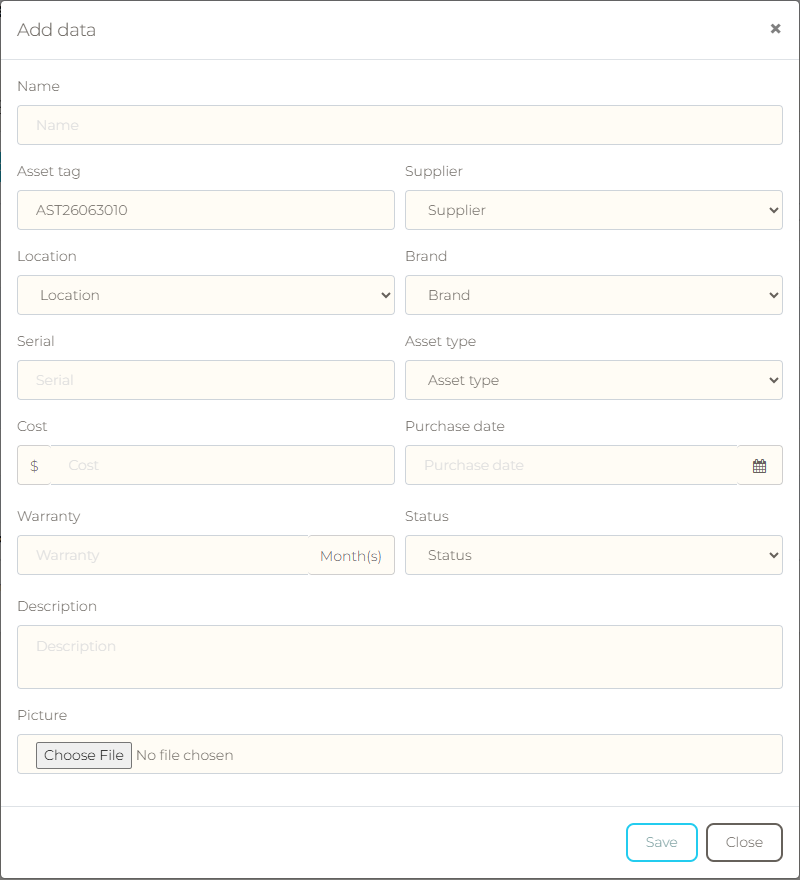
| Field | What to enter |
|---|---|
| Name | The familiar asset name, such as Laptop Lenovo X43 or Warehouse Loader. |
| Asset tag | The unique tracking code. The system can generate this automatically. |
| Supplier, location, brand, asset type | Select existing values so reports group assets correctly. |
| Quantity / current stock | Enter the starting stock quantity. Stock movements will update current stock after the item is created. |
| Low-stock threshold | The alert point for this asset. If current stock is at or below this number, the item is shown as low stock or out of stock. |
| Serial, cost, purchase date, warranty | Use purchase or inventory records when available. Serial number and warranty can be left blank when they do not apply. |
| Status | Choose the current condition or availability of the asset. |
| Description and picture | Add helpful identifying notes and a picture if available. |
Using the Row Action Menu
Each asset row has a three-dot action menu. Use it when you need to update or inspect a specific asset.
Asset Detail Page
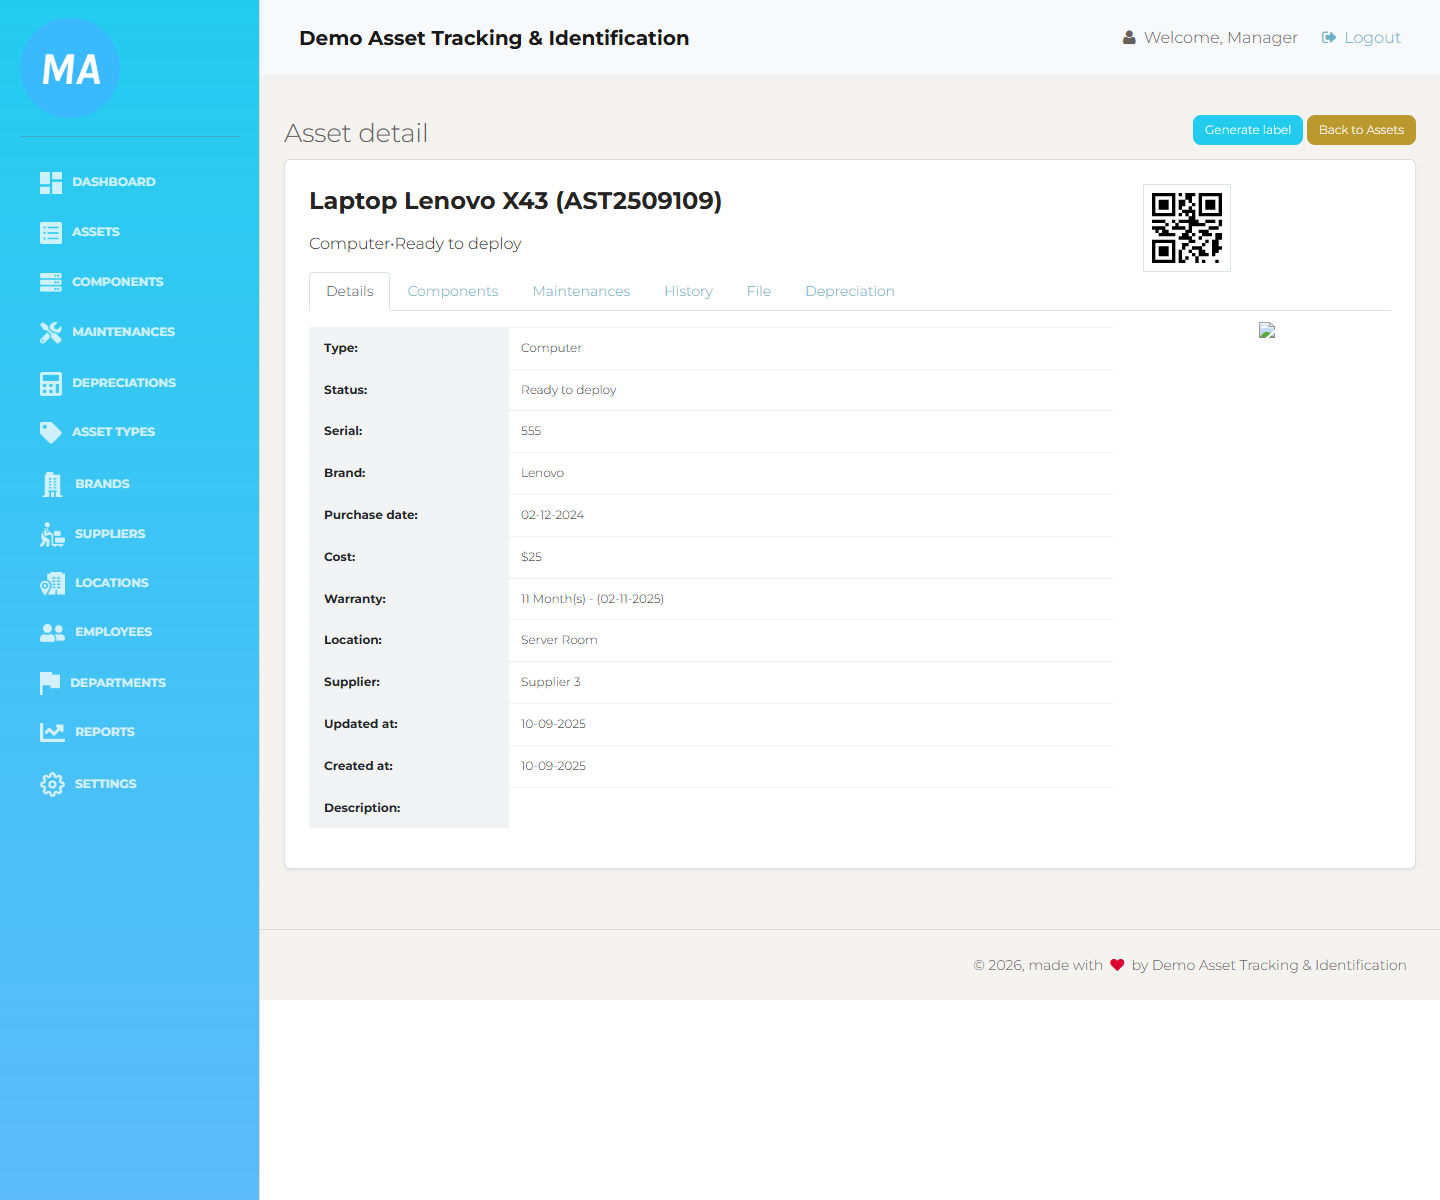
The detail page is the best place to understand the full story of an asset. It shows the asset QR code and identifying information, plus tabs for details, linked components, maintenance history, activity history, stock movement history, files, and depreciation.
Check-In and Check-Out
Checkout means the asset is assigned to a person for active use. Checkin means the asset is returned to storage or the company warehouse.
Components
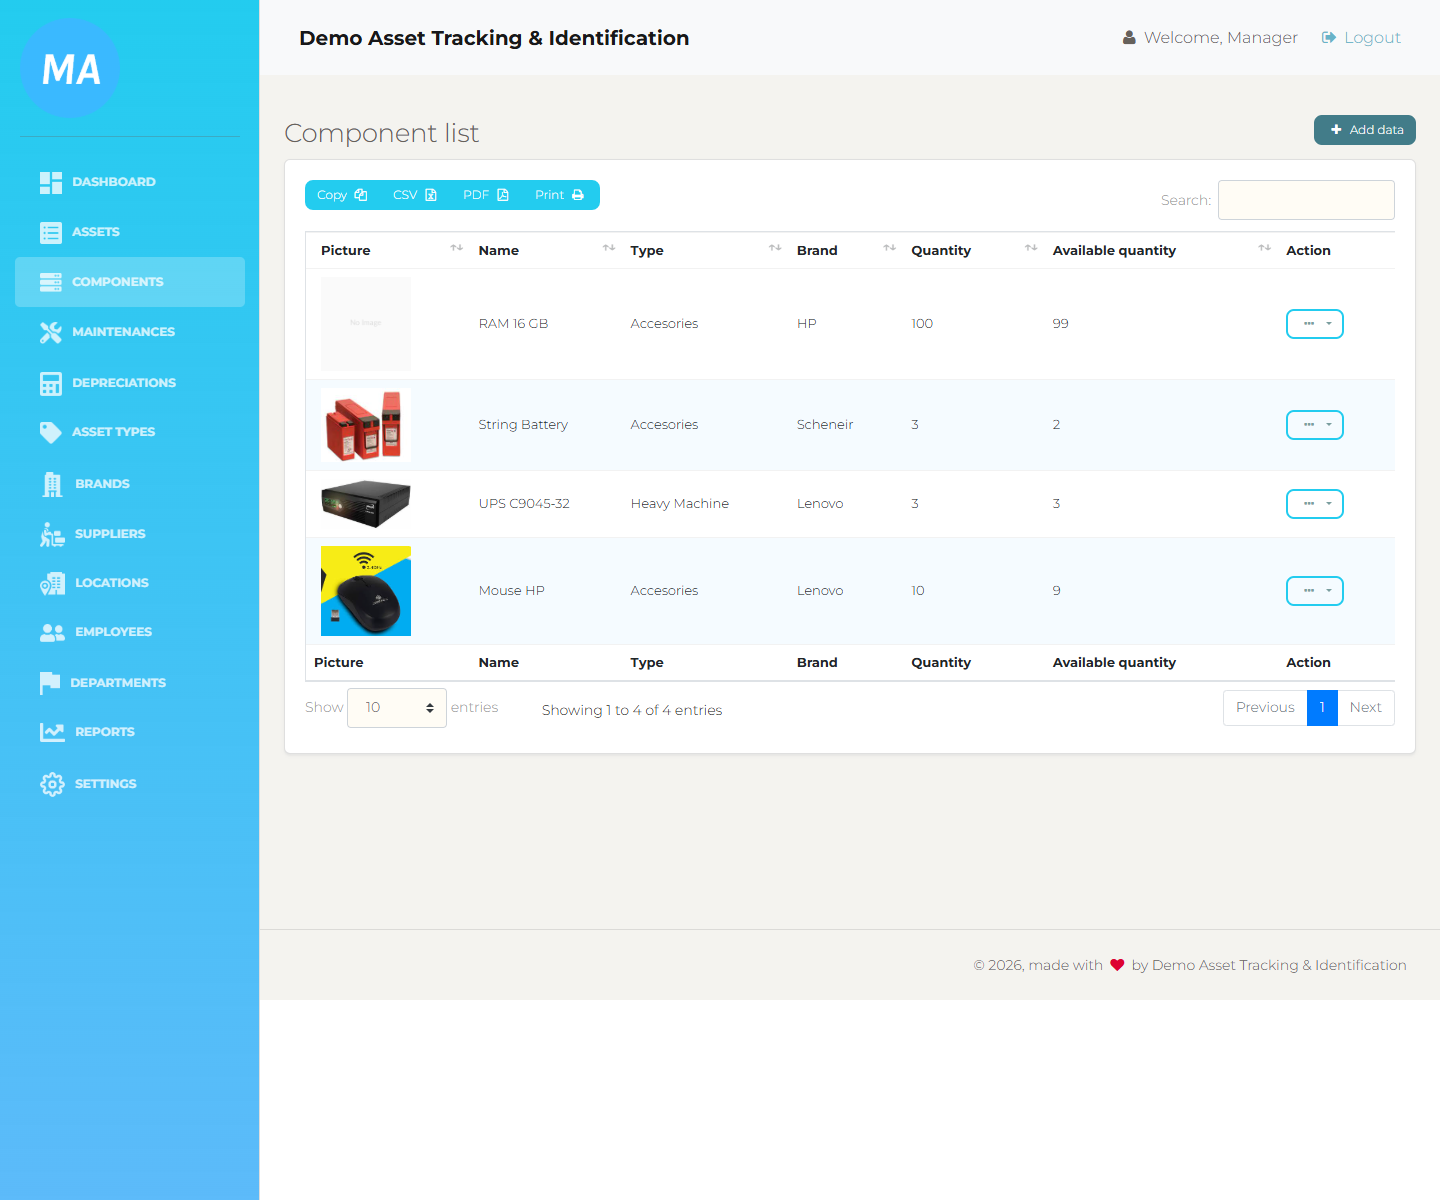
A component is a part or smaller item that can belong to an asset, such as RAM, a mouse, a battery, or a keyboard. Components are managed separately so the company can track parts as they move between storage, employees, and assets.
- Add components from Components > Add data.
- The Asset field is optional when adding or editing a component. Select an asset when the component permanently belongs to it, or select None when it is shared stock or has not yet been allocated.
- If a component is linked, its asset appears in the Component list and the component appears in that asset's Components tab.
- Use the list columns to see storage location, current stock, stock status, linked asset, and latest status at a glance.
- Use the action menu to view details, generate a label, create maintenance, edit, delete, check out current stock, or check in previously checked-out quantity.
- Component check-in opens the component detail page first, because one component can be split across multiple assets and the exact assignment/quantity must be selected safely.
- When a component is checked out or checked in, choose the location manually when the form asks for it.
- Serial number and warranty can be left blank for components where those details do not apply.
Component Detail Page
The Component detail page follows the Asset detail layout as closely as the component workflow allows. The header shows the component name, generated component tag, type, status, QR code, Generate label button, and a link back to Components.
Stock Control
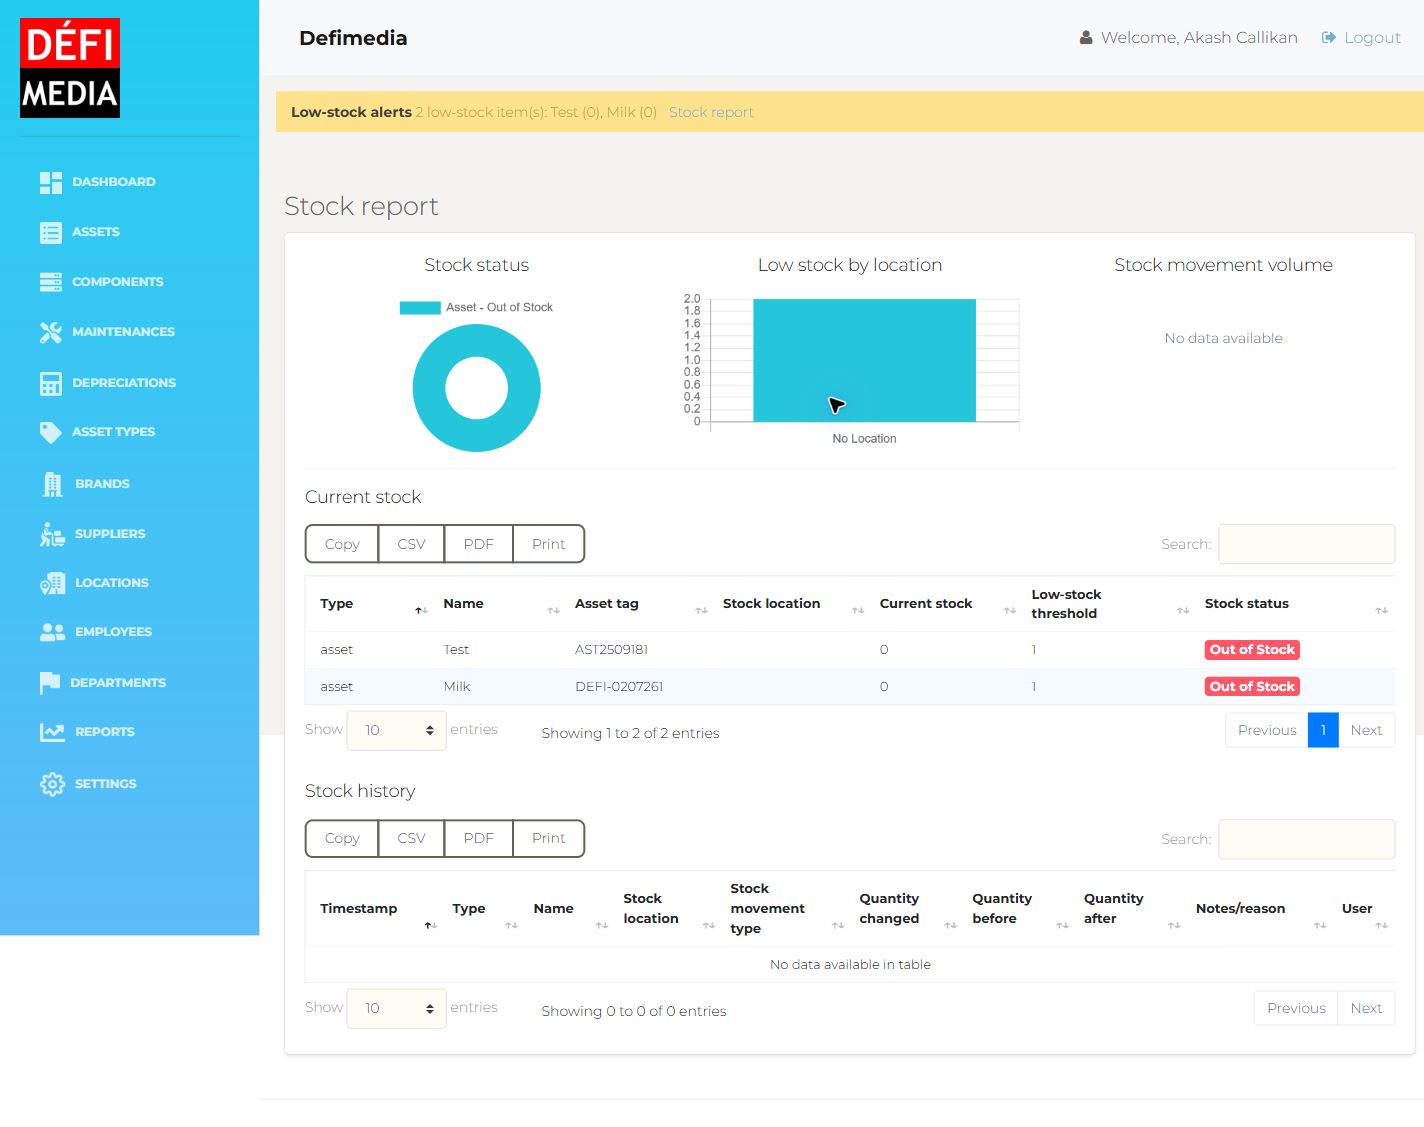
Stock control tracks how many units of each asset or component are currently available, where stock is located, and how stock changes over time. The system prevents stock from going below zero.
Stock Status
Recording Stock Movements
Use stock movements when stock is received, issued, corrected, or moved. Each movement records the stock location, movement type, quantity changed, quantity before, quantity after, notes or reason, user, and timestamp.
| Movement type | Use it when |
|---|---|
| Stock in | New stock arrives or returned stock should increase the current quantity. |
| Stock out | Stock leaves storage, is issued, consumed, or otherwise reduces current quantity. |
| Adjustment | A correction is needed after a count or audit. |
| Transfer | Stock is moved between company locations without changing the total quantity. |
Labels and QR Codes
Labels are one of the quickest ways to connect the physical item to its record in the system. Print a label with a QR code for each asset or component, stick it to the item, and scan it whenever you need to open that item’s details.
Why Labels Matter
A label turns each physical item into something anyone can identify quickly. Instead of searching manually by name or tag, scan the QR code and the system opens the correct asset or component page directly.
- Use labels for assets such as laptops, cameras, tools, machines, and furniture.
- Use labels for components where practical, especially parts that move between assets or locations.
- Keep the label visible, clean, and protected so the QR code can be scanned easily.
Printing Labels
- Find the item. Go to Assets or Components and find the correct row.
- Generate the label. Open the three-dot action menu and select Generate label. The same button is also available at the top of both detail pages.
- Print clearly. Print the label at a size where the QR code scans without zooming or guessing.
- Attach it securely. Stick the label somewhere visible but protected from heat, water, dirt, rubbing, or frequent handling.
- Test the scan. Scan the QR code once after sticking it on the item to confirm it opens the correct asset or component record.
What Appears on a Label
| Label | Printed information |
|---|---|
| Asset | Asset name, asset tag, serial number, asset type, and the QR code that opens the Asset detail page. |
| Component | Component name, automatically generated component tag, serial number (or a dash when none exists), component type, and the QR code that opens the Component detail page. |
Scanning Labels
When you scan a label’s QR code with a phone or scanner, it should take you directly to that item in the Asset Management System. If you are not already signed in, the system may ask you to log in first, then show the item details.
Maintenance
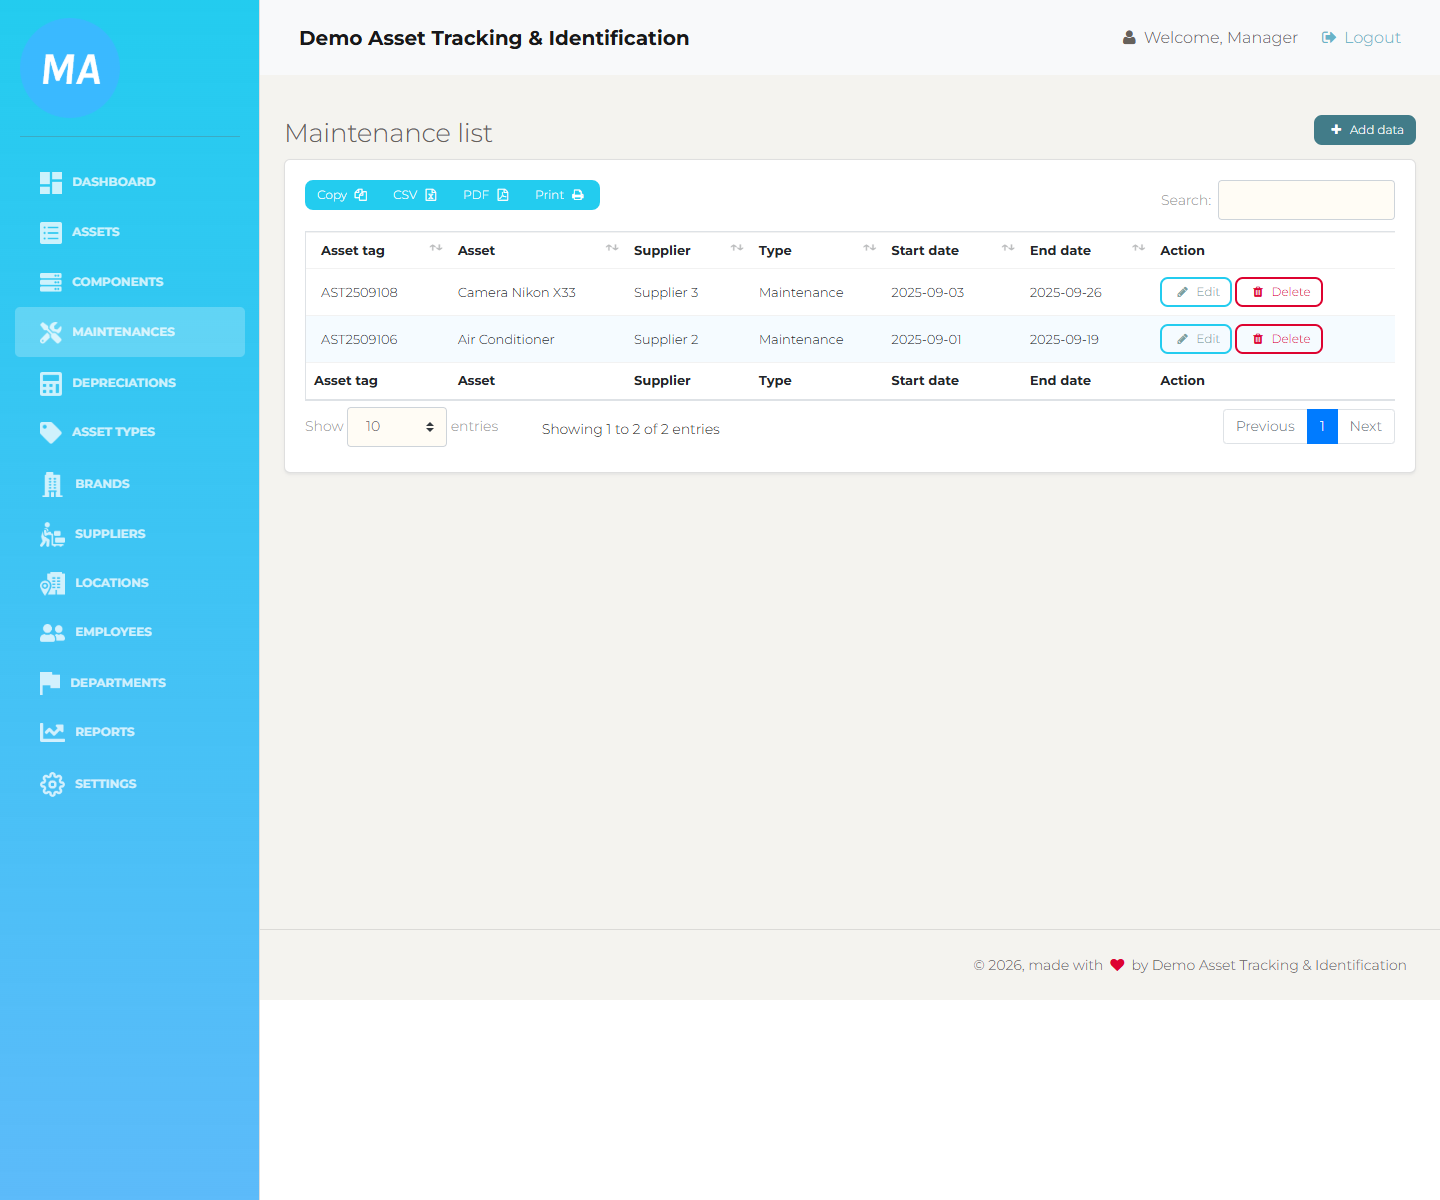
Maintenance records help track assets and components that need service, repair, inspection, or follow-up. Use this area when either item type is under maintenance or needs planned work.
Adding Maintenance
Click Add data, choose whether the item is an Asset or Component, select the exact item, supplier, maintenance type, start date, and end date, then save the record. You can also choose Maintenance from either list's row action menu; the selected item is then prefilled.
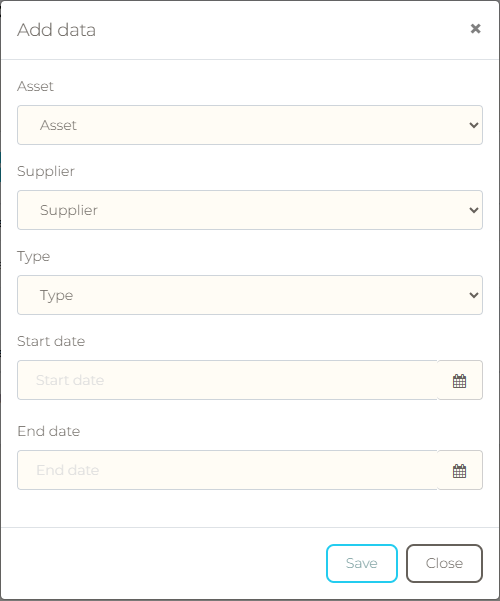
- Select the correct item type first, then the exact asset or component.
- Starting from an asset or component row action menu reduces the risk of choosing the wrong record.
- Use the supplier field if an outside company is involved.
- Keep dates up to date so reports show an accurate maintenance timeline.
- Review maintenance history from the Maintenances tab on either item's detail page.
Depreciation Optional
Depreciation is used when the company wants to track how the value of an asset or component reduces over time. This is mainly useful for finance, accounting, insurance, or management reporting. If you only need to know where an item is and who has it, you can skip this section.
When to Use Depreciation
- Use it for higher-value assets where the company needs to track current value.
- Use it when finance or management asks for value reports over a period of time.
- Use it for components only when those components have meaningful value on their own.
- Do not use it for small consumables or low-value items.
Adding a Depreciation Record
- Open Depreciations. Use the left menu and click Depreciations.
- Click Add data. A form will open for the depreciation details.
- Choose the category. Select whether the depreciation is for an Asset or a Component.
- Select the item. Choose the exact asset or component from the dropdown list.
- Enter the period. Add the depreciation period in months.
- Enter the asset value. Add the value to be depreciated. The system will prevent values that are higher than the original cost.
- Save the record. Review the depreciation list or the item detail page when you need to check the calculation later.
What the Depreciation List Shows
The Depreciations list shows the item name, cost, period, category, asset value, and available actions. Use it to review existing depreciation records, edit them when a mistake is found, or delete records that were created incorrectly.
Reference Data
Reference data is the supporting information used by asset and component records. Keeping it clean makes the entire system easier to search and report on.
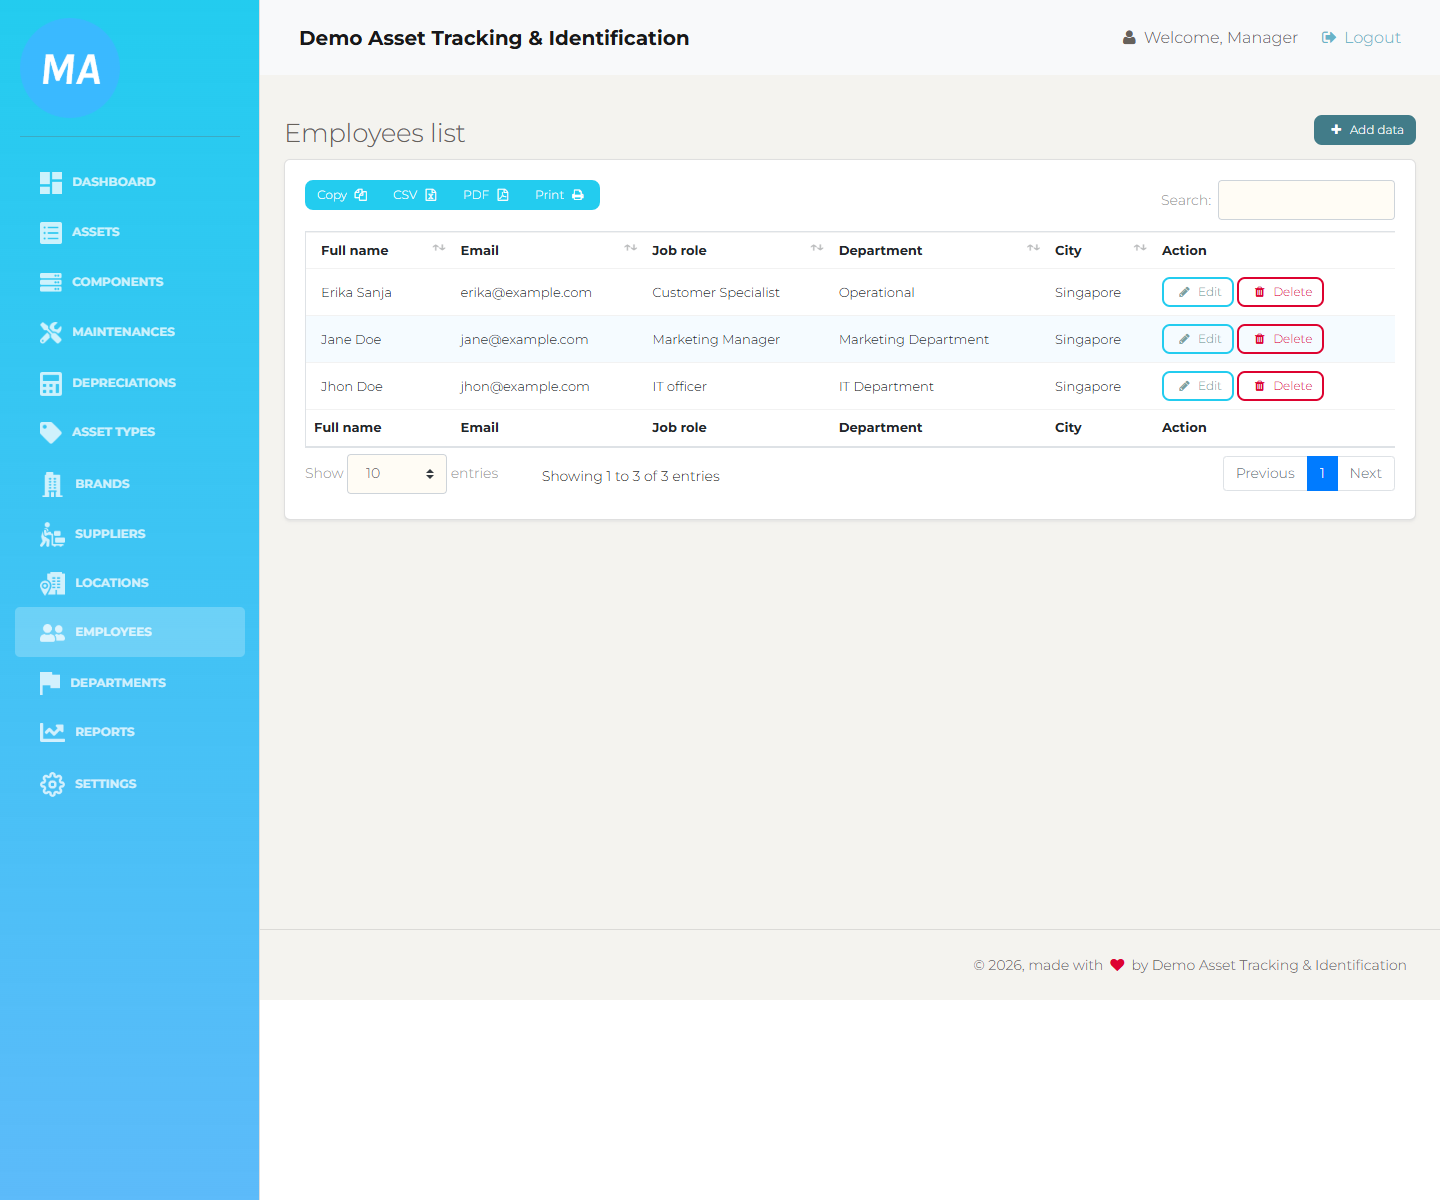
| Menu | Purpose | Use it when |
|---|---|---|
| Employees | People who receive or use assets/components. Employee location is entered manually and is not taken from the company Locations list. | An asset or component will be checked out to someone new, or employee contact/location details need correcting. |
| Departments | Employee or asset department groups. | You need cleaner employee and reporting structure. |
| Locations | Company locations/buildings where assets, components, and stock can be stored, used, checked in, checked out, transferred, or reported. | A new office, building, store room, studio, warehouse, or company site is added. |
| Suppliers | Vendors or service providers. | You buy assets or send items for maintenance. |
| Asset Types | Categories such as Computer, Heavy Machine, or Real Estate. | You need assets grouped correctly in reports. |
| Brands | Manufacturers or product brands. | You add assets/components from a new brand. |
| Depreciations | Optional value tracking for assets/components over time. | Finance or management needs depreciation details. |
Managing Locations
Use Locations to manage the company’s locations and buildings. Locations can be added one by one, imported from CSV, edited, deleted individually, or deleted in bulk with Delete All when you intentionally need to reset the list.
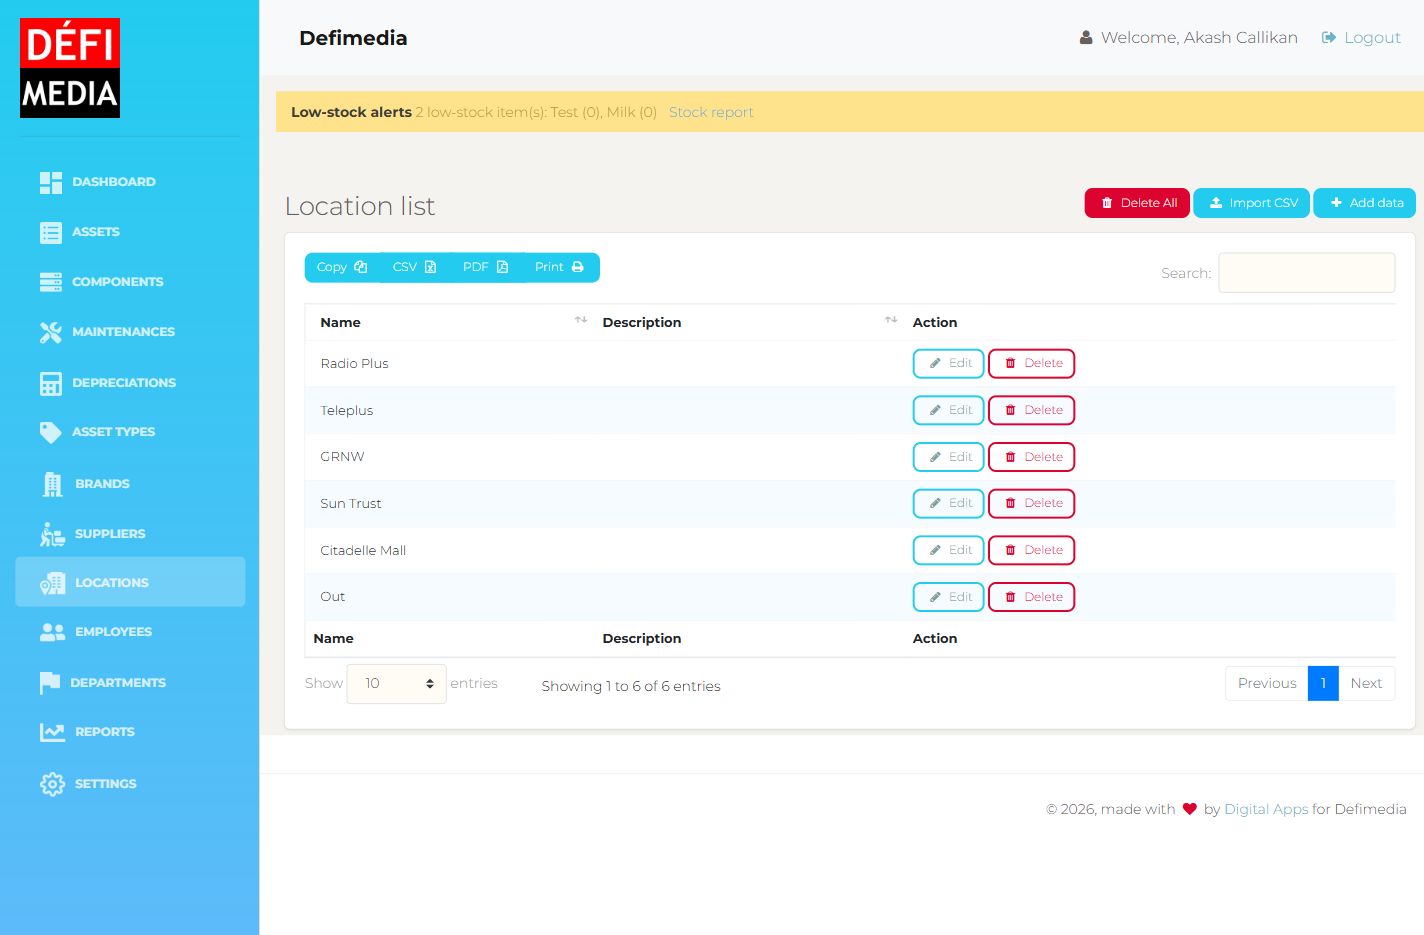
Importing Locations
Use Locations > Import CSV when you need to add many offices, buildings, warehouses, studios, or storage areas at once. The CSV should use the columns name and description. The header row is optional, and duplicate location names are skipped.
| name | description |
|---|---|
| Port Louis | Capital city |
| Curepipe | Central town |
Users and Settings
Users control who can access the system and what they can see or edit. Settings control system-wide details such as email configuration and low-stock email recipients.
User Roles and Asset Type Access
The system uses three main roles: Admin, Manager, and Staff. Admin users have full access. Manager and Staff users can be assigned to specific asset types, and they will only see assets/components in those categories throughout the system.
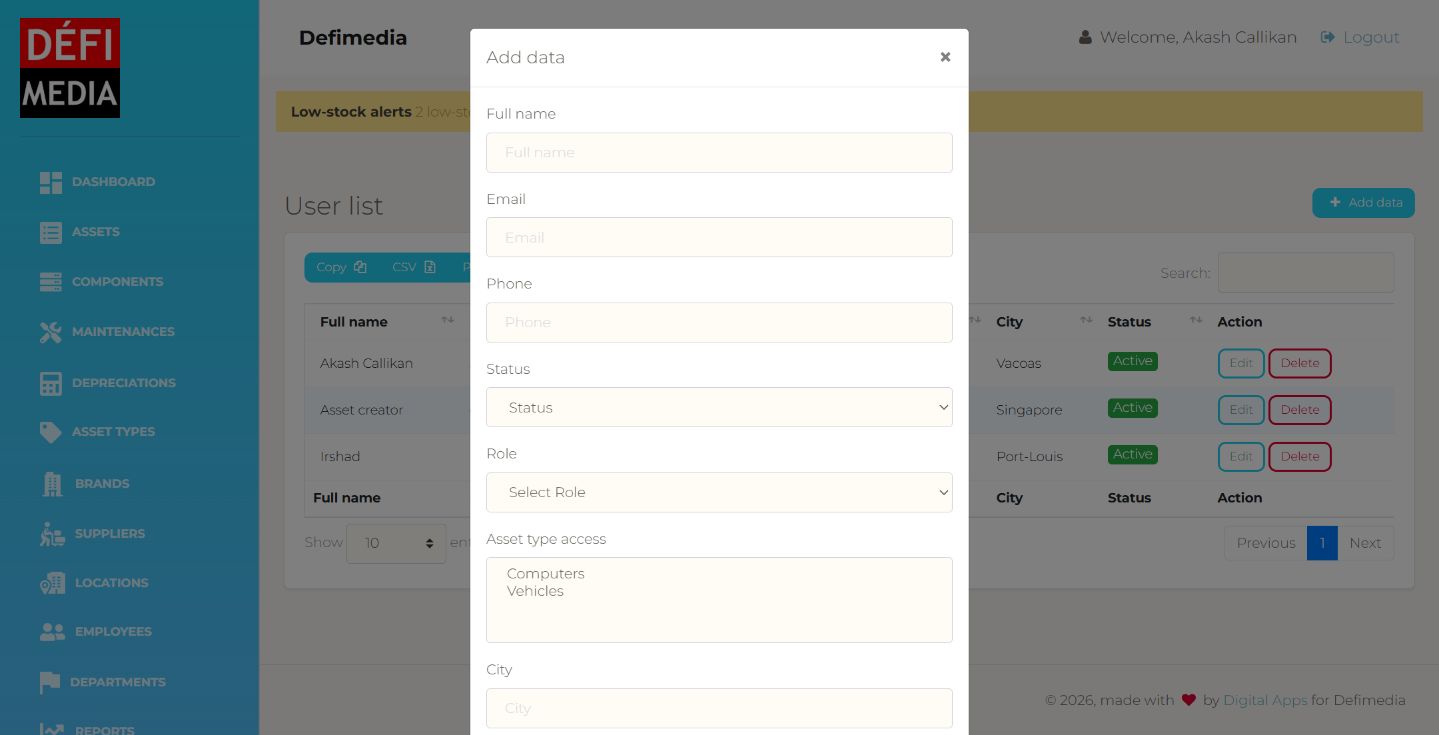
- Use Asset type access when creating or editing a Manager or Staff user.
- Managers and Staff with no assigned asset types will not see any assets or components.
- Managers and Staff can only edit assets/components they authored when they also have the relevant edit permission.
- Admins bypass these restrictions and can access all records.
Low-Stock Email Alerts
Low-stock email recipients are selected in Settings. The selected users receive email alerts when stock becomes low, and the manual Send Low-Stock Alert button sends a current low-stock summary to those recipients.
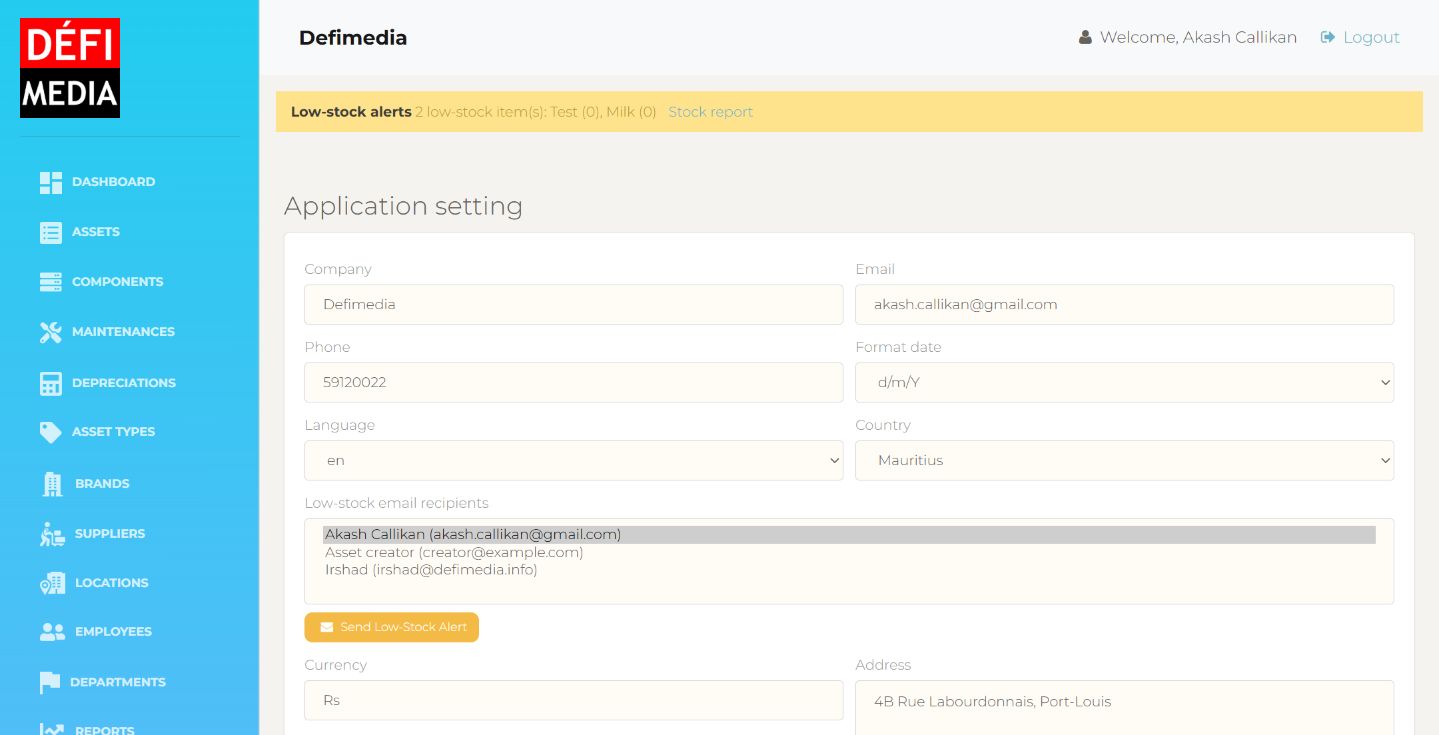
- Use Ctrl-click or Shift-click to select multiple low-stock email recipients.
- Email is sent using the system’s configured mail settings. For Gmail, use the Gmail SMTP/app-password settings configured in Settings.
- The email sender name should match the company/system settings rather than the default Laravel name.
Reports
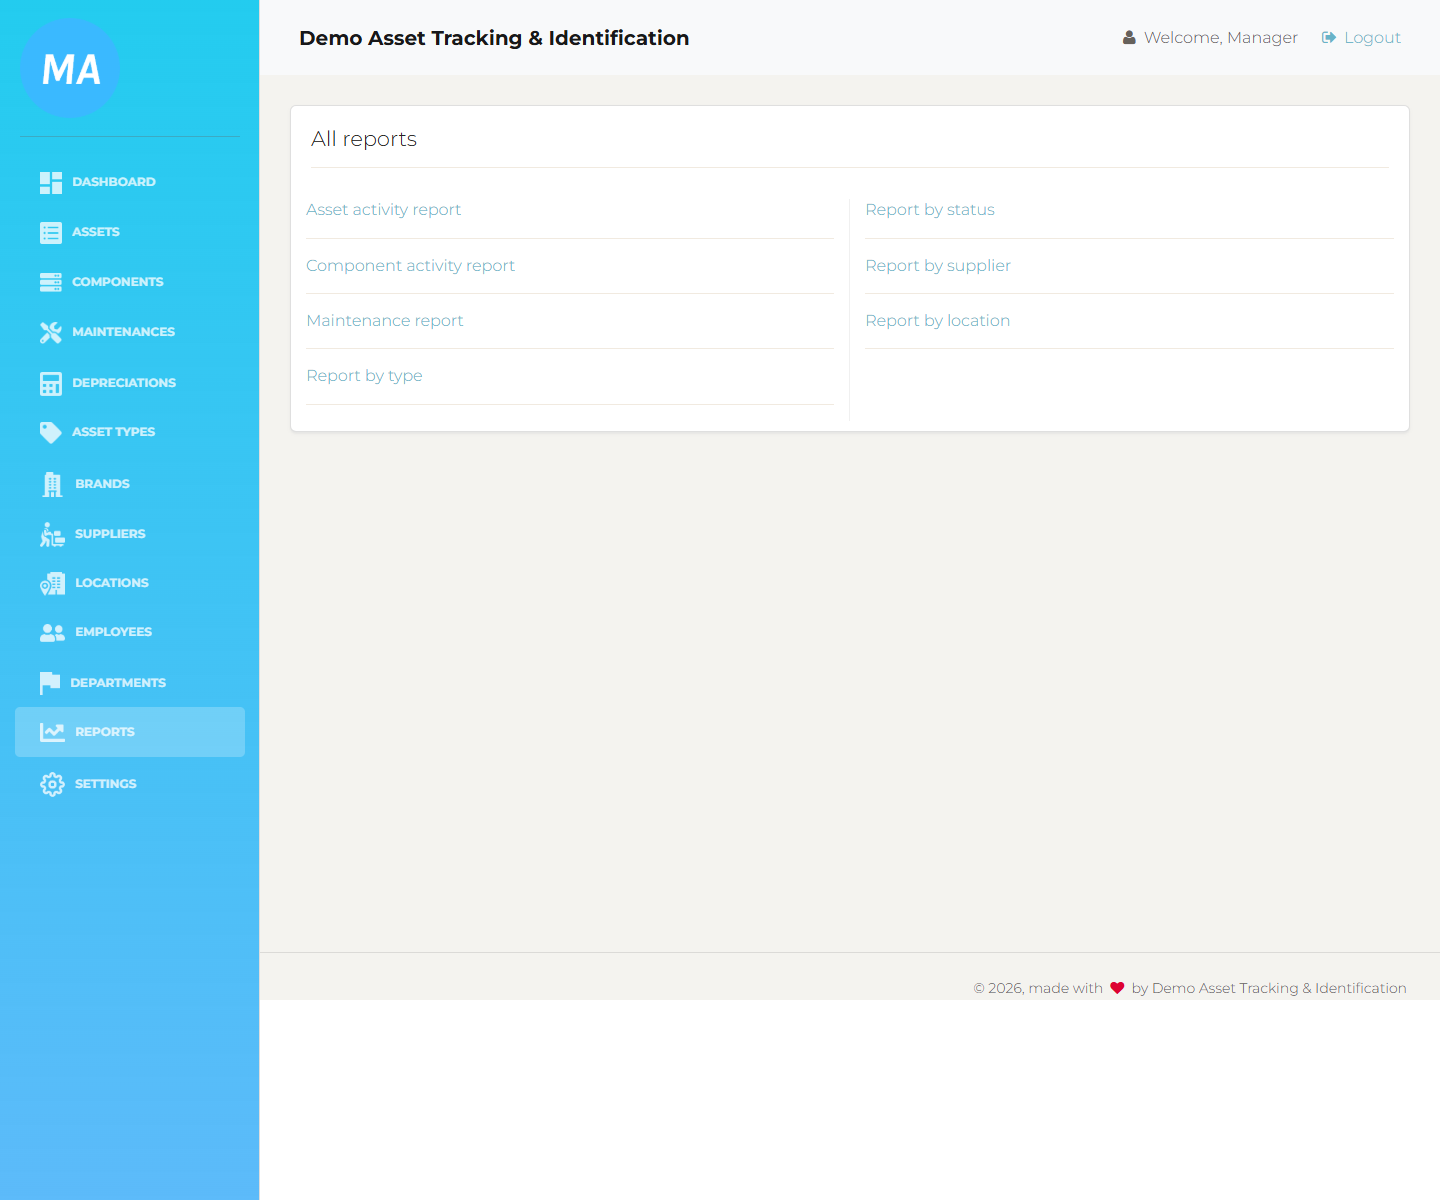
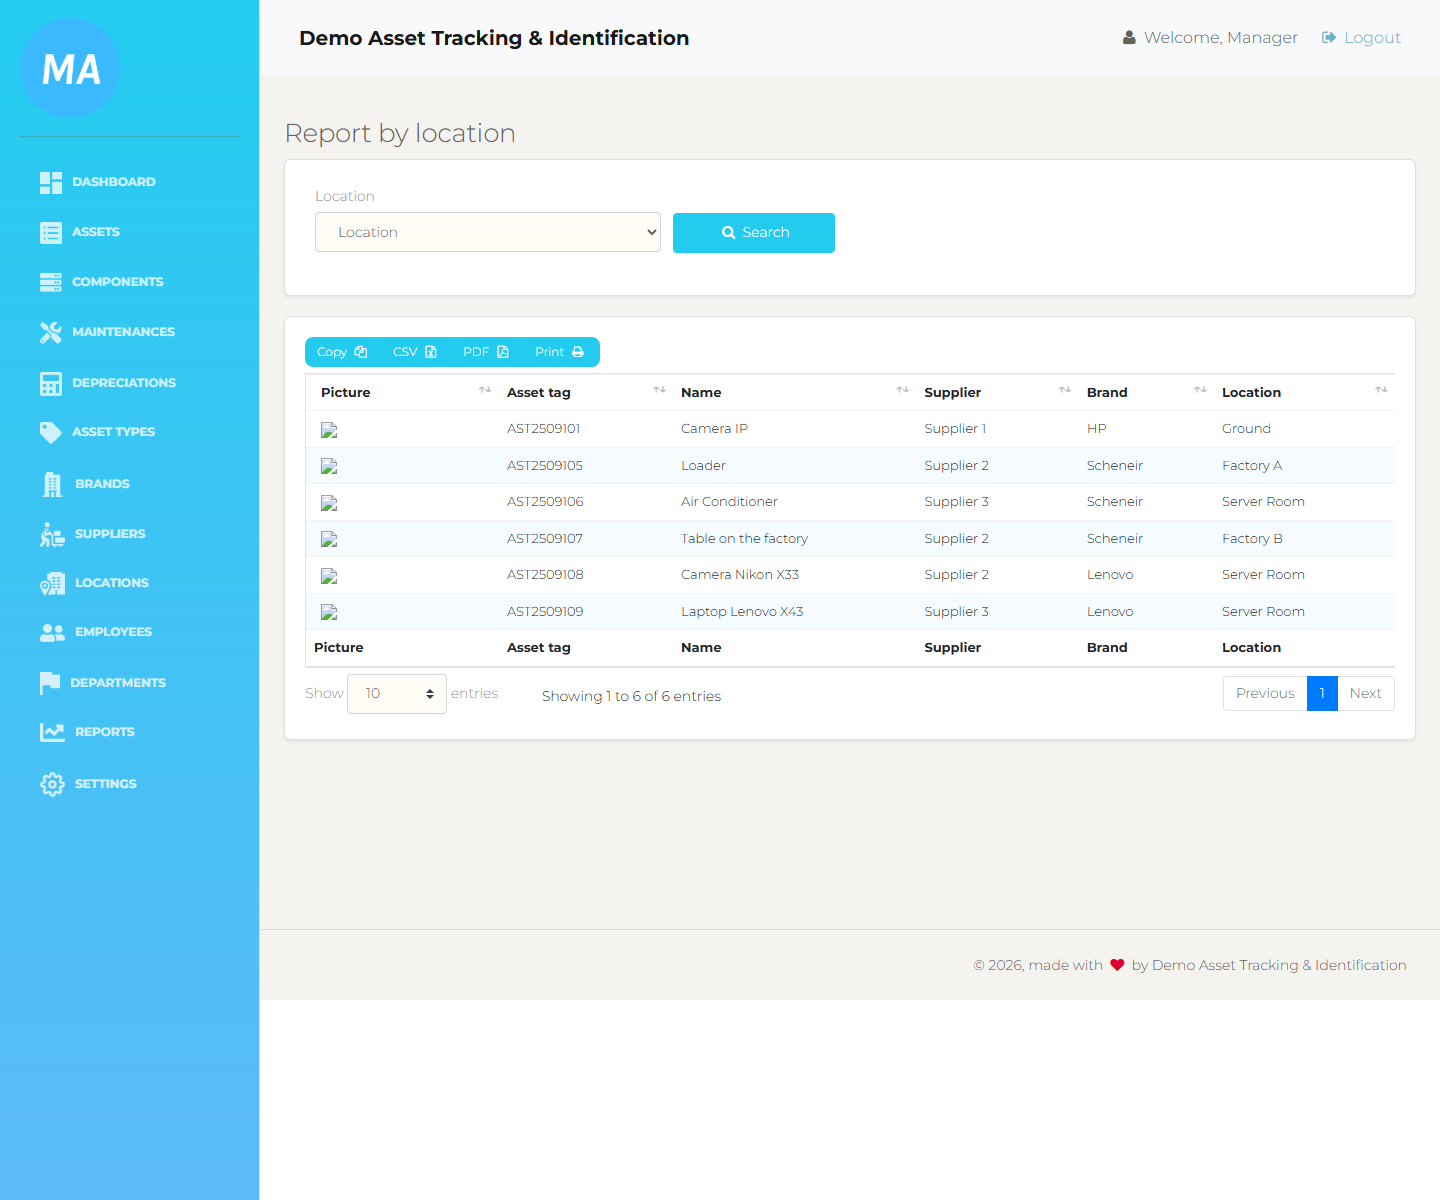
Reports help you answer management questions without opening every individual asset. The Reports menu groups the main report types in one place, and several reports include charts for faster review.
Best Practices
For Daily Use
- Search first before adding a new asset, component, employee, location, supplier, brand, or type.
- Use clear asset and component names that other employees will recognize.
- Link a component to an asset when it permanently belongs to that asset; otherwise leave the optional Asset field set to None.
- Keep check-in/check-out records current. The list pages now show the latest employee or assigned asset, status, location, and date at a glance.
- Add company locations first, then manually choose the correct location during stock movements, checkout, and checkin.
- Review low-stock alerts daily and use the Stock report to see which items need replenishment.
- Use notes/reason on stock movements so future users understand why a quantity changed.
- Print and attach QR code labels so employees can scan physical items and open the correct record instantly.
- Add pictures, serial numbers, warranty, and purchase details when available, but leave serial/warranty blank when they do not apply.
- Use the asset or component row action menu to create maintenance records as soon as an item is sent for service or repair.
- Use depreciation only when financial value tracking is required.
- Use Inventory insights and Stock reports for meetings instead of manually copying rows from multiple screens.
Before Deleting Anything
Deletion can remove useful history. Only delete records created by mistake or confirmed as no longer needed. When unsure, edit the status or add a note instead of deleting.
Suggested Training Flow
- Show the dashboard and explain the totals.
- Open the Assets list and show current stock, stock status, location, employee, and status directly in the table.
- Open the row action menu and explain Checkout, Checkin, Detail, Generate label, Maintenance, Stock movement, Edit, and Delete.
- Open the Add asset form and explain stock quantity, low-stock threshold, optional serial/warranty, and the important reference fields.
- Open Components and explain current stock, stock status, optional linked asset, location, Generate label, and Maintenance.
- Open the Stock report and explain Stock in, Stock out, Adjustment, Transfer, stock history, and low-stock alerts.
- Show how to generate a QR code label and explain that scanning it opens the item directly.
- Open Locations and explain company locations/buildings, CSV import, and Delete All.
- Open Users and explain Manager/Staff asset type access.
- Open Settings and show low-stock email recipients and Send Low-Stock Alert.
- Open Maintenance or an asset/component row Maintenance action, explain the Item type selector, and prepare a sample record without saving test data.
- Mention Depreciation as optional and mainly for finance or management value tracking.
- Open Reports and show Stock report, Inventory insights, and how to export a location or status report.